Raspberry Pi can make the single-board Compute Module to run and test your projects and live for production. Now, in this tutorial, we can learn about how we can install Ubuntu 24.04 Server on the Raspberry Pi 5 Module.
For doing this we need given requirements:
- Raspberry Pi Compute Hardware
- Memory Card (Minimum 16GB)
- Laptop or Computer
- Memory Card Reader
Install Ubuntu on Raspberry Pi 5
For the Ubuntu installation on the Raspberry Pi, there is no need for any additional keyboard, mouse, or monitor. We can install any operating system on the Raspberry Pi with just the help of a laptop or computer. Now our first step is to make the bootable SD card with the help of the Raspberry Pi image builder.
Build Bootable SD Card
Our first step is now to go to your laptop or computer and download the Raspberry Pi Image Builder. Now install the software and attach the SD card to the device using the SD card reader. Now open the Raspberry Pi Image Builder software to show the given dashboard.
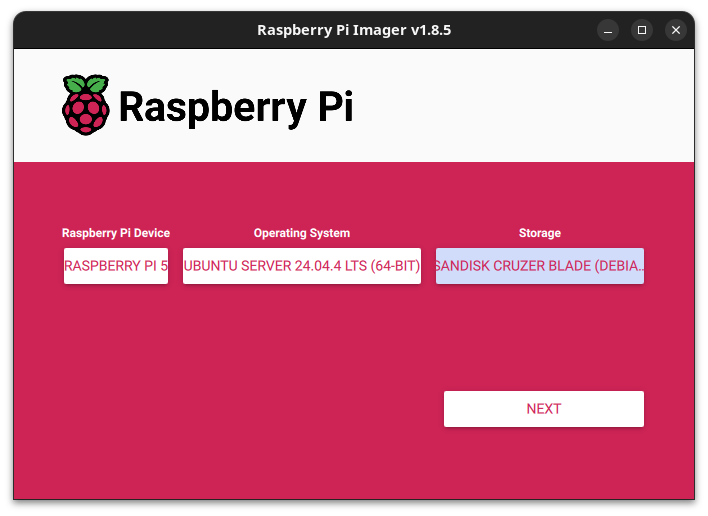
Now here we need to Select the Given Options:
- Raspberry Pi Device: RASPBERRY PI 5
- Operating System: Other General-purpose OS > Ubuntu > Ubuntu Server 24.04.4 LTS
- Storage: Select the SD Card
After doing this, you can see the small OS Customization pop-up window. Now select the EDIT SETTINGS option to open the new window.
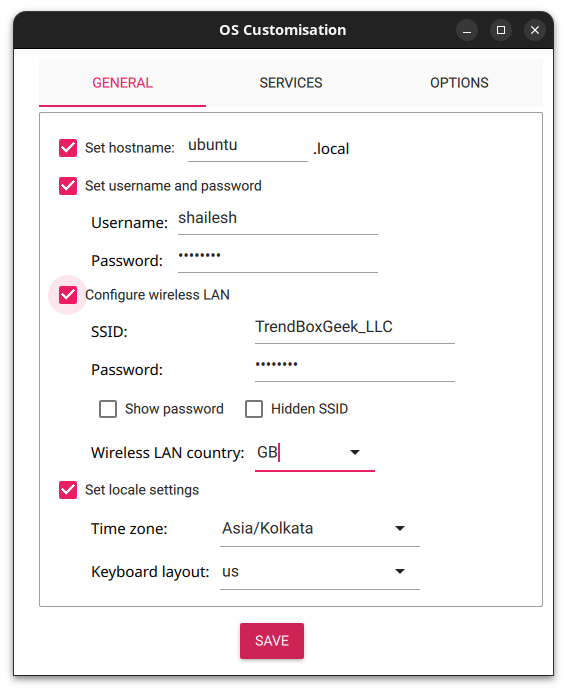
Now in this tab, you can set the hostname, username, and password first. Now you can see the wireless LAN option; if your laptop is connected to WiFi with the same network you need in the Ubuntu server, then tick this option. It's useful because when your Raspberry device is ready, it will automatically connect to the same WiFi. Now set your time zone and move to the services tab from the top of the list.
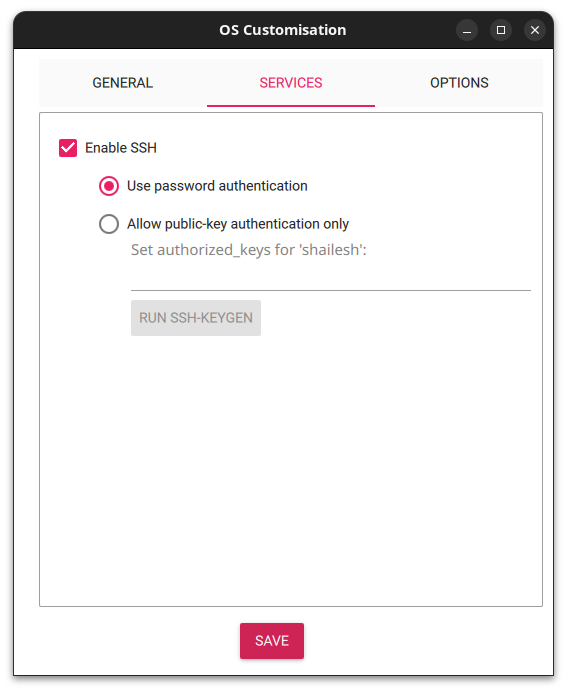
This is a most useful step to use the headless Ubuntu Server over the Raspberry Pi. Now select the Enable SSH option and use the password authentication option, and now click on the save button to jump to the Use OS Customisation tab. Here, select Yes to start the Raspberry Pi OS downloading process. It may take up to 15 minutes for downloading and writing the OS to the SD card. After completing the process, eject the SD card from the laptop. Now our Ubuntu Server is ready.
Boot Ubuntu in the Raspberry Pi
Now insert the SD card directly into the Raspberry Pi device and boot it now. It takes about a minute, and the server is ready. Now access your local network admin panel and find your Raspberry Pi device, then connect your laptop and Raspberry Pi to the same network and access it now over SSH.
ssh user@RASPBERRY_PI_IP_ADDRESS
Now input your real credentials and access the server, and install any services for testing and production.