
ERPNext is an open-source tool. Installing ERPNext V15 on Raspberry Pi is a big thing. First, I installed Ubuntu 24.04 server on Raspberry Pi 5. Before we start, let me tell you about critical bugs in ERPNext v15 installation on Ubuntu 24.04 that are not documented anywhere officially.
In this guide, I will walk you through the complete, tested installation of ERPNext v15 on Ubuntu 24.04 that also works on Raspberry Pi 5. So, follow my commands step by step.
System Requirements
- Device : Raspberry Pi 5
- OS : Ubuntu 24.04
- RAM : 4GB minimum
- Storage : 40GB
Here we will install ERPNext V15, Frappe Framework V15, Python 3.12, Node.js 18.x, MariaDB 10.11, Redis 7.0, Nginx, and Supervisor's latest version.
Update & upgrade server
In lunux every time when we install new packages or system, we required to over system is up to date. So we first create our system up to date using below commands.
sudo apt-get update && sudo apt-get upgrade -y
Create New User
In Linux, when we install a new tool for security, we always create a new user. So here we create a new frappe user. You can choose any username according to your requirement.
sudo adduser frappe
sudo usermod -aG sudo frappe
su - frappe
Note: If you do not use the username frappe, then every time you see frappe, replace it with your username.
Install All Dependencies
Installing ERPNext v15 on Raspberry Pi 5 requires the below dependencies. So we install all dependencies for the Ubuntu 24.04 server.
sudo apt-get install -y git python3 python3-pip python3-venv python3-dev \
curl wget redis-server mariadb-server mariadb-client \
libmariadb-dev xvfb libfontconfig1 wkhtmltopdf \
libssl-dev libffi-dev build-essential
Install Node.js
For Raspberry Pi 5, we install Node 18.x version.
curl -fsSL https://deb.nodesource.com/setup_18.x | sudo -E bash -
sudo apt-get install -y nodejs
Install Yarn
sudo npm install -g yarn
Verify All Installations
Now we verify all installations using the below commands.
python3 --version
git --version
node --version
yarn --version
redis-cli ping
Expected Output:
Python 3.12.3
git version 2.43.0
v18.20.8
1.22.22
PONG
MariaDB Configuration
MariaDB is a popular, open-source relational database management system that is a replacement for MySQL. When you enter the below command, the system will ask questions — answer them the same as in the quotation below.
sudo mysql_secure_installation
Answer the prompts as follows:
Enter current password for root: (Press ENTER)
Switch to unix_socket authentication: N
Change the root password: Y → Enter strong password
Remove anonymous users: Y
Disallow root login remotely: Y
Remove test database: Y
Reload privilege tables: Y
Configure MariaDB Character Set
Paste this whole command into the terminal, then press Enter and your MariaDB config file will be set up completely.
sudo tee /etc/mysql/mariadb.conf.d/50-server.cnf > /dev/null <<'EOF'
[mysqld]
character-set-client-handshake = FALSE
character-set-server = utf8mb4
collation-server = utf8mb4_unicode_ci

[mysql]
default-character-set = utf8mb4
EOF
Restart & Enable MariaDB
Every time we make a change to the config file, restart and enable MariaDB using the below commands.
sudo systemctl restart mariadb
sudo systemctl enable mariadb
Redis Configuration
When we install all dependencies, the Redis server is also installed at that time, but here we need to enable, start, and fix the Redis server config file.
sudo systemctl enable redis-server
sudo systemctl start redis-server
sudo sysctl vm.overcommit_memory=1
echo 'vm.overcommit_memory = 1' | sudo tee -a /etc/sysctl.conf
Install Python Package Manager
curl -LsSf https://astral.sh/uv/install.sh | sh
source $HOME/.local/bin/env
Install Frappe Bench
sudo pip3 install frappe-bench --break-system-packages
Setup Frappe Bench & ERPNext
Now we perform the most important setup using the below command. After applying the below command, it will take some time on Raspberry Pi 5, so be patient!
bench init --frappe-branch version-15 frappe-bench
cd frappe-bench
Now our directory change to frappe-bench.
ERPNext & Payments App
We download ERPNext and the Payment App using the below commands. The Payment app is also useful, so we download it as well.
bench get-app --branch version-15 erpnext
bench get-app --branch version-15 payments
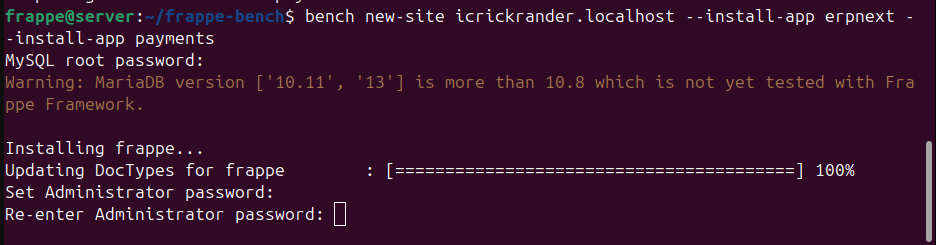
Create New Site
For ERPNext, we create a new site here. You can choose your site name as needed and replace it in the below command. Replace yoursite.localhost with your new site name.
bench new-site yoursite.localhost --install-app erpnext --install-app payments
In this step, you will first be asked for your MariaDB password. After entering your MariaDB password, set your Administrator password, which is required when you login to the ERPNext home page.
Enable Scheduler & Set Default Site
In this step, also replace your site name with the site name you selected.
bench --site yoursite.localhost enable-scheduler
bench use yoursite.localhost
Now If you want to check your intermideate process is done so use command below.
bench start
Then check your ERPNext using below command and this command replace with your IP ADDRESS.
http://your-server-ip:8000
But here, do not login — only check, then go back to your terminal and press Ctrl+C and move forward.
Production Setup
Install Nginx & Supervisor
sudo apt-get install nginx supervisor -y
Install Ansible
sudo apt-get install ansible -y
Generate Nginx Config
bench setup nginx
sudo cp /home/frappe/frappe-bench/config/nginx.conf /etc/nginx/conf.d/frappe-bench.conf
sudo rm -f /etc/nginx/sites-enabled/default
Fix Nginx log_format Error
When you work with Nginx some error also found in installation. Here we fix bug using below command. Enter whole config file on terminal then your bug must be fixed.
sudo tee /etc/nginx/nginx.conf > /dev/null <<'EOF'
user www-data;
worker_processes auto;
pid /run/nginx.pid;
error_log /var/log/nginx/error.log;
include /etc/nginx/modules-enabled/*.conf;

events {
    worker_connections 768;
}

http {
    sendfile on;
    tcp_nopush on;
    types_hash_max_size 2048;
    include /etc/nginx/mime.types;
    default_type application/octet-stream;
    ssl_protocols TLSv1 TLSv1.1 TLSv1.2 TLSv1.3;
    ssl_prefer_server_ciphers on;

    log_format main '$remote_addr - $remote_user [$time_local] "$request" '
                    '$status $body_bytes_sent "$http_referer" '
                    '"$http_user_agent" "$http_x_forwarded_for"';

    access_log /var/log/nginx/access.log main;
    gzip on;
    include /etc/nginx/conf.d/*.conf;
    include /etc/nginx/sites-enabled/*;
}
EOF
Fix Assets Path in Nginx
In production we deploy our site on Nginx port so some error also found in Nginx then we asset path in Nginx.
sudo sed -i 's|location /assets {|location /assets {\n\talias /home/frappe/frappe-bench/sites/assets;|' /etc/nginx/conf.d/frappe-bench.conf
Test & Start Nginx
sudo nginx -t && sudo systemctl restart nginx
Supervisor Setup
Now we set up Supervisor for installing ERPNext on Raspberry Pi 5.
bench setup supervisor
sudo cp /home/frappe/frappe-bench/config/supervisor.conf /etc/supervisor/conf.d/frappe-bench.conf
sudo supervisorctl reread
sudo supervisorctl update
sudo supervisorctl restart all
Enable All Services
Now we enable all services using the below commands.
sudo systemctl enable nginx
sudo systemctl enable supervisor
sudo systemctl enable redis-server
sudo systemctl enable mariadb
Build Assets & Clear Cache
In this step we assets and all cache clear using below commands for ubuntu server.
bench build --force
In this step, replace your site name.
bench --site yoursite.localhost clear-cache
bench --site yoursite.localhost clear-website-cache
Then enter the below commands. Here we also change file permissions.
sudo chmod -R 755 /home/frappe
sudo chmod -R 755 /home/frappe/frappe-bench/sites
sudo systemctl restart nginx
sudo supervisorctl restart all
Final Verification
Now we check here final verification of installing successfully ERPNext V15 on Raspberry Pi 5 using below command.
sudo supervisorctl status
Expected Output:
frappe-bench-redis:frappe-bench-redis-cache               RUNNING
frappe-bench-redis:frappe-bench-redis-queue               RUNNING
frappe-bench-web:frappe-bench-frappe-web                  RUNNING
frappe-bench-web:frappe-bench-node-socketio               RUNNING
frappe-bench-workers:frappe-bench-frappe-long-worker-0    RUNNING
frappe-bench-workers:frappe-bench-frappe-schedule         RUNNING
frappe-bench-workers:frappe-bench-frappe-short-worker-0   RUNNING
Access ERPNext
Open your browser and go to:
http://your-server-ip
Then open your ERPNext home page like this image.
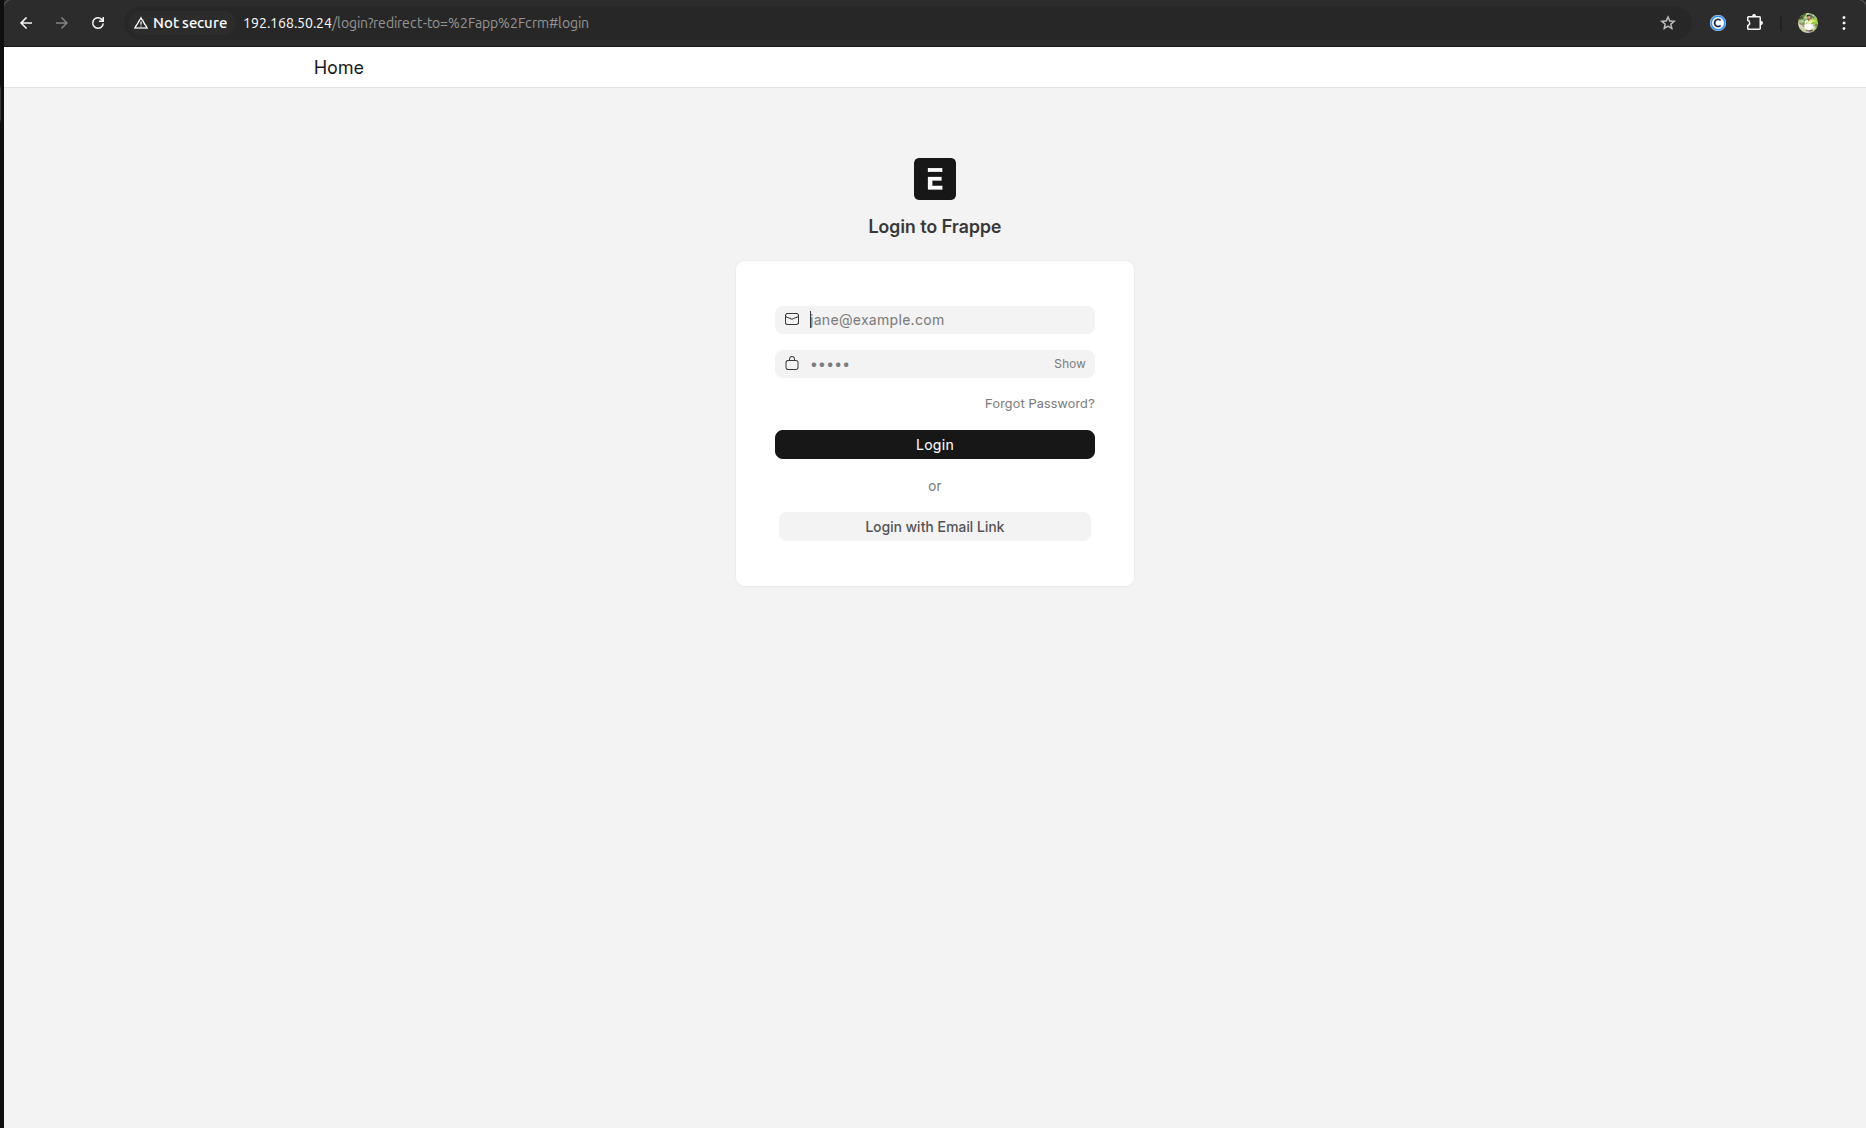
Enter here in the first field: Administrator
Password: Your Administrator Password
Finally, we have installed ERPNext on Raspberry Pi 5 with Ubuntu server 24.04.
