
If you have spun up a new Linux server, when you open the SSH port and check your logs a few hours later, you know the drill. It takes about five minutes for automated bots to find your IP and start hammering it with fake passwords.
You should be using Ed25519 SSH keys and disabling password logins. But you still don't want these bots using your server's resources. Then you need to add Fail2ban to your defense system. Fail2ban watches your logs, spots the bots failing to log in, and automatically tells your firewall to block their IPs.
Most tutorials on the internet are outdated. If you follow them on Ubuntu 26.04 LTS, then Fail2ban will either create a massive, unreadable config file, or it will just silently crash.
Here is the modern, headache-free way to set up Fail2ban.
Install the Packages
Before we start Fail2ban, make sure your firewall is allowing your SSH traffic, otherwise you're about to lock yourself out of your own server.
Notice we are installing python3-systemd. Do not skip this. Ubuntu 26.04 heavily uses systemd for logging. Without this Python package, Fail2ban won't know how to read your SSH logs and will just crash in the background.
Run this to update your server and install the tools.
sudo apt update && sudo apt upgrade -y
sudo apt install fail2ban ufw python3-systemd -y
Next, make sure your firewall is on and allowing SSH:
sudo ufw allow ssh
sudo ufw enable
Stop Editing jail.local
If you are watching an old tutorial that tells you to copy jail.conf into jail.local and edit it, don't follow it. That creates a 1,000-line monster of a file that is a headache to read and easy to break, and is sometimes easily overwritten during upgrades.
The best, sysadmin-approved way to configure Fail2ban on Ubuntu 26.04 is by creating small drop-in files in the /etc/fail2ban/jail.d/ directory. Fail2ban reads these last, overriding any default settings without the mess. This setup keeps everything clean for your server.
Let's create a single file to define our global defaults and enable the SSH guard:
sudo nano /etc/fail2ban/jail.d/99-custom.local
Write Your Rules
Before pasting the block, make sure to change the ignoreip to match your home network's subnet (like 192.168.1.0/24). This way, if you are trying to connect to the server but enter the wrong password more than three times, it will still not permanently ban your own laptop from your server.
Paste the following block into your new file 99-custom.local.
[DEFAULT]
# Whitelist your local network so you don't lock yourself out.
# Swap 192.168.100.0/24 with your actual local subnet.
ignoreip = 127.0.0.1/8 ::1 192.168.100.0/24

# Ban attackers for 24 hours
bantime  = 24h

# If they fail 3 times within 10 minutes, they get banned
findtime = 10m
maxretry = 3

[sshd]
enabled = true
# Change 'ssh' to your custom port number if you aren't using port 22 (e.g., port = 2244)
port = ssh
backend = systemd
To save the file, press Ctrl+O, Enter, then Ctrl+X.
Turn It On
Now that the config is in place, we restart the Fail2ban service to apply it and set it to boot on startup.
sudo systemctl enable fail2ban
sudo systemctl restart fail2ban
Check the status to ensure it's actively guarding your server.
sudo fail2ban-client status
Expected Output:

How to Actually Use It
Fail2ban runs silently in the background, but you will need to interact with it. Here are the commands I actually use day-to-day.
Test your setup with a fake ban:
Want to see the firewall block in action? You can manually feed Fail2ban a dummy IP.
sudo fail2ban-client set sshd banip 203.0.113.99
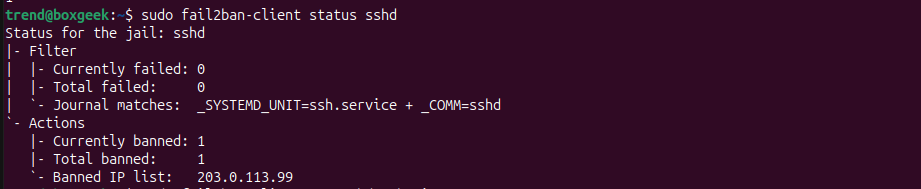
Check who is currently banned:
sudo fail2ban-client status sshd
Expected Output:
How to forgive an IP
Did you lock out a friend? Use the unban command to let them back in:
sudo fail2ban-client set sshd unbanip 203.0.113.99
Watch Fail2ban work in real-time:
If you want to watch the logs to see IPs getting banned live:
sudo tail -f /var/log/fail2ban.log
Conclusion
Fail2ban is a "set and forget" tool. This setup reduces the attack surface of your server. Paired with UFW, a custom SSH port, and key-based authentication, your Ubuntu 26.04 server will be highly resilient against automated network scanning and script kiddies.
