
If you have set up a fresh Ubuntu server for your homelab or cloud environment, you already know the process. Within minutes of getting a public IP, your /var/log/auth.log starts lighting up with automated bots hammering your SSH port.
For a long time, the default sysadmin advice has always been to install Fail2Ban. It works, but it operates in a complete bubble. Fail2Ban only learns from the attacks that hit your machine, making it a reactive, isolated tool.
So we go with an alternative to Fail2Ban: CrowdSec. First, let's understand CrowdSec. It improves the traditional security model by using crowdsourced threat intelligence. When an attacker targets a server on the CrowdSec network, their IP is flagged and shared globally with millions of other servers. Using this, you end up banning attackers before they get a chance to scan your open ports.
If you are setting up a fresh Ubuntu 26.04 LTS server, here is exactly how to secure it with CrowdSec.
Install the CrowdSec Security Engine
The security engine is the brain of the operation. It reads your logs, analyzes them, and detects harmful behavior.
Run the following commands to add the repository and install the engine.
curl -s https://install.crowdsec.net | sudo bash
Before installing CrowdSec, update and upgrade your Ubuntu server.
sudo apt update && sudo apt upgrade -y
Now install CrowdSec using the command below.
sudo apt install crowdsec -y
Using the command below, ensure that the main CrowdSec service is running and enabled.
sudo systemctl enable --now crowdsec
Once this finishes, the engine is actively reading your logs. But right now, it can only detect threats. It cannot block them yet.
Deploy the Firewall Bouncer
To block the malicious IPs that the engine identifies, you need a "bouncer". Bouncers work at your firewall and drop the traffic.
In Ubuntu 26.04 Canonical has fully standardized on nftables as the default firewall backend, moving away from iptables. When installation starts, ensure you use the nftables version of the bouncer.
However, the Debian package crowdsec-firewall-bouncer-nftables currently has a broken post-installation script. When installed via apt, it attempts to generate an API key before its configuration directory exists, crashing with exit status 1 and breaking your entire dpkg state.
First, ensure nftables is running and create the directories the installer expects.
sudo apt install nftables -y
sudo systemctl enable --now nftables
Create the necessary directories to prevent installation errors.
sudo mkdir -p /etc/crowdsec/bouncers/ /usr/local/bin/ /var/log/crowdsec/
Next, download the binary directly from GitHub and install it.
wget https://github.com/crowdsecurity/cs-firewall-bouncer/releases/download/v0.0.34/crowdsec-firewall-bouncer.tgz
Extract the tarball.
tar -xzvf crowdsec-firewall-bouncer.tgz
Navigate into the extracted directory.
cd crowdsec-firewall-bouncer-v0.0.34/
Now run the official installation script using the command below.
sudo ./install.sh
During the installation script, it will detect both nftables and iptables. When prompted, type nftables and hit Enter.
Configure the Bouncer for nftables
The official binary still uses the old iptables backend in its configuration file. We need to manually change it to nftables.
sudo nano /etc/crowdsec/bouncers/crowdsec-firewall-bouncer.yaml
At the top, the first line shows the mode. If the mode is iptables, change it to nftables. If the default mode is already nftables, there is nothing to do. Save the file and exit.
Now, enable and start the bouncer service.
sudo systemctl enable crowdsec-firewall-bouncer

sudo systemctl start crowdsec-firewall-bouncer
Now verify that the bouncer is actively talking to CrowdSec.
sudo cscli bouncers list
Expected Output:

Install Service Collections
CrowdSec uses "collections" to protect your system. A collection is a bundle of pre-made tools that reads your system logs and spots cyberattacks. By default, CrowdSec detects that you are running Linux and installs the SSH collection automatically. You should still double-check this setup, especially if you want to secure other homelab apps like Nginx, Traefik, or Docker later.
First, install the SSH collection just to be safe, then restart the service to apply any new collections. For that, run the commands below in your terminal.
sudo cscli collections install crowdsecurity/sshd

sudo systemctl restart crowdsec
The Ultimate CrowdSec Cheat Sheet
CrowdSec is managed through the cscli command-line tool. You don't need to memorize everything, but you should keep the following four everyday commands handy.
First, see what logs are actively being parsed.
sudo cscli metrics
Second, view the list of actively banned IP addresses.
sudo cscli decisions list
Third, manually ban a suspicious IP address.
sudo cscli decisions add -i IP_ADDRESS -R "Manual ban for port scanning"
Then, unban an IP address.
Replace IP_ADDRESS with the IP you want to block.
sudo cscli decisions delete -i IP_ADDRESS
Connect to the Global Hive Mind
To get the full power of CrowdSec, you should enroll your server in the free CrowdSec Console. This web dashboard gives you the best visual overview of your server's alerts.
Create a free account at https://app.crowdsec.net/. Then log in, find Engines on the left side, and click on it. In the Engines block, scroll down and find Connect with Console, then use the enrollment key in the command below.
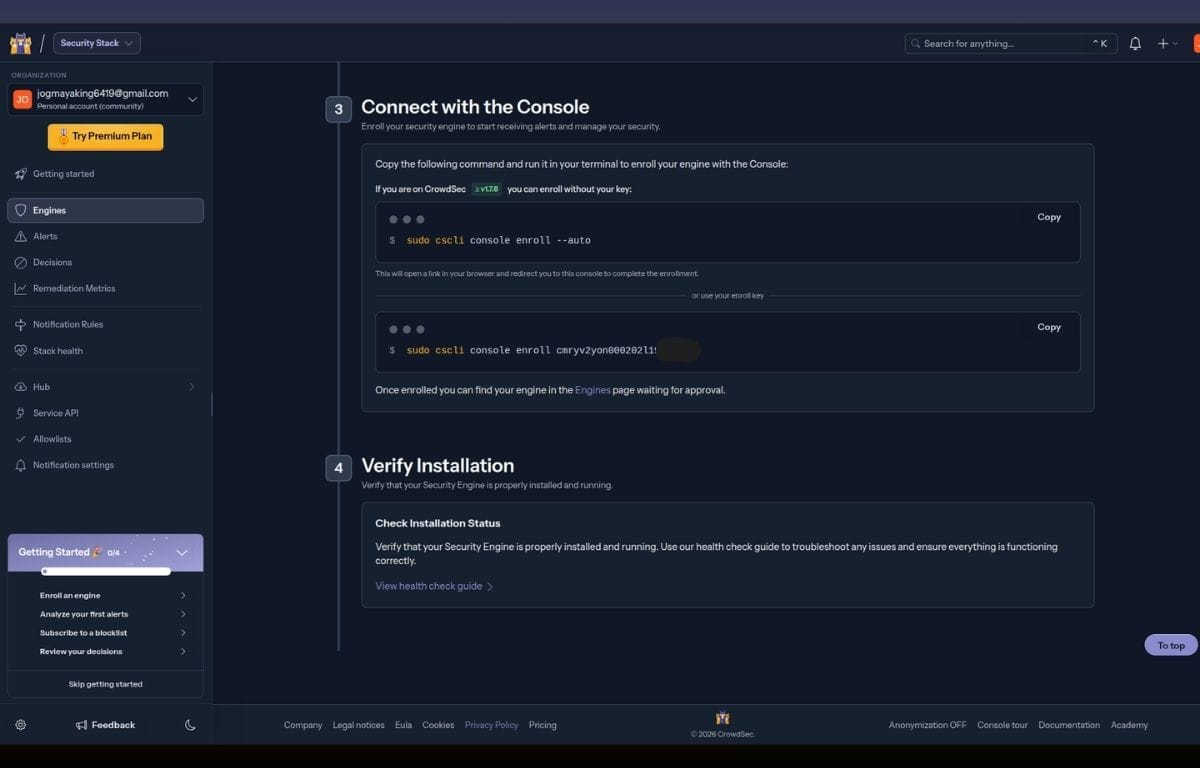
sudo cscli console enroll your-unique-enrollment-key
Then restart CrowdSec.
sudo systemctl restart crowdsec
Now, your Ubuntu 26.04 server is silently dropping malicious traffic and contributing to a safer internet for the rest of us.
