
Managing network infrastructure without centralized logging is like solving a puzzle in the dark. As your environment grows, you have to jump between servers, routers, and switches. Doing this just to fix a single issue is impossible to sustain.
A centralized Syslog server collects all network logs into one secure place. This repository gives you total visibility over your system. It makes troubleshooting much faster. It helps you meet security auditing requirements. It ensures you pass compliance checks.
Here is a step-by-step guide to setting up a centralized Syslog server. This guide uses Rsyslog. Rsyslog is the default logging daemon on Linux. It is the most widely used logging tool.
Choosing the Right Syslog Server
Choose the right tool for your environment before you start. Rsyslog is the default on most modern Linux systems. It is lightweight. It is very fast. It is highly configurable. Syslog-ng features advanced filtering. It features advanced routing capabilities. Modern log management stacks offer advanced visualization. They offer advanced searching tools. Many organizations forward Syslog data into the Elastic Stack. Others use Graylog. Others use Splunk.
This guide focuses on setting up Rsyslog. We will use a standard Linux environment. Ubuntu is a good example. Debian is another example. Rsyslog provides the most accessible foundation for centralized logging.
Step-by-Step Rsyslog Server Setup
Step 1: Install or verify Rsyslog
Most Linux distributions come with Rsyslog pre-installed. First, we check if our Linux system has Rsyslog pre-installed using the below command.
sudo systemctl status rsyslog
If it is not found or the system is not running it, then we will install Rsyslog using the below command.
sudo apt update
sudo apt install rsyslog -y
Step 2: Edit the Rsyslog Configuration
In this step, we will edit the configuration file of Rsyslog. To edit it, open the main configuration file using nano or another text editor, but we will go with nano.
sudo nano /etc/rsyslog.conf
When the config file is open, we edit it as per the below instructions.
Enable UDP and/or TCP Reception
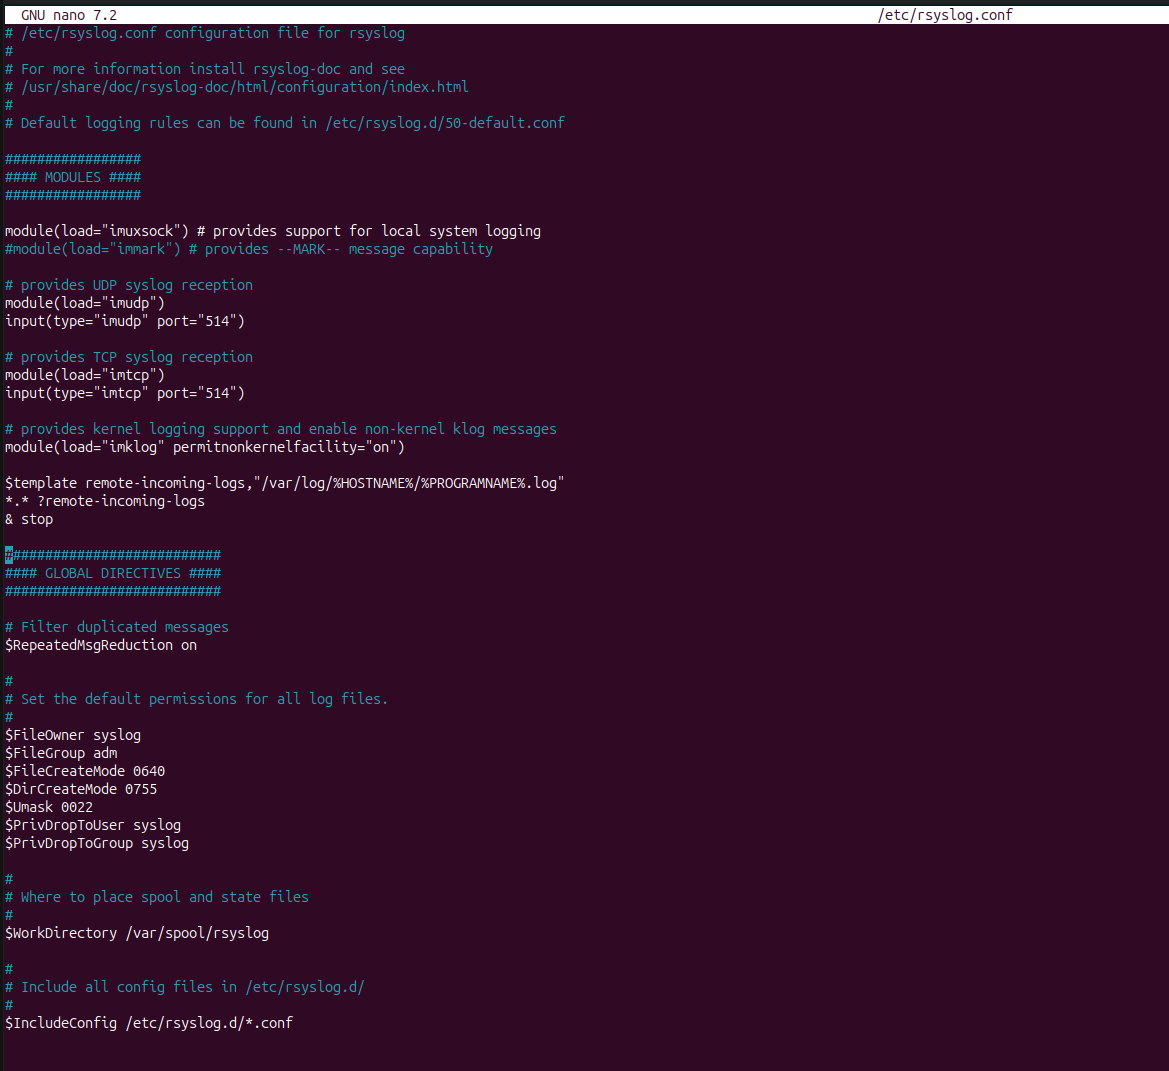
Scroll down to the MODULES section. To allow the server to receive logs, you need to uncomment the lines for UDP, TCP, or both.
To use UDP, uncomment these lines:
module(load="imudp")
input(type="imudp" port="514")
To use TCP, uncomment these lines: TCP is slow but guarantees log delivery.
module(load="imtcp")
input(type="imtcp" port="514")
Create a Template for Incoming Logs
Incoming logs mix with local logs by default. Tell Rsyslog to create separate directories for each client. This step keeps files organized. Add this configuration block. Place it right before the GLOBAL DIRECTIVES section.
$template remote-incoming-logs,"/var/log/%HOSTNAME%/%PROGRAMNAME%.log"
*.* ?remote-incoming-logs
& stop
After applying above all instruction in config file then finally our Rsyslog config file show like below image.
Step 3: Restart and Verify
Save the file and exit the editor. Now, we restart the Rsyslog service using the below command.
sudo systemctl restart rsyslog
sudo systemctl enable rsyslog
Verify that the server is actively listening on port 514 using the below command.
sudo ss -tulnp | grep rsyslog
Step 4: Configure the Firewall
Ensure your firewall allows incoming traffic on port 514. If you are using UFW:
For Ubuntu or Debian
sudo ufw allow 514/udp
sudo ufw allow 514/tcp
For CentOS or RHEL
sudo firewall-cmd --permanent --add-port=514/udp
sudo firewall-cmd --permanent --add-port=514/tcp
sudo firewall-cmd --reload
Step 5: Configuring a Syslog Client
Now your server is ready. This step applies to your other server or client server. All steps in this section are performed on your client server. On a client Linux machine, open its Rsyslog configuration file:
sudo nano /etc/rsyslog.d/50-default.conf
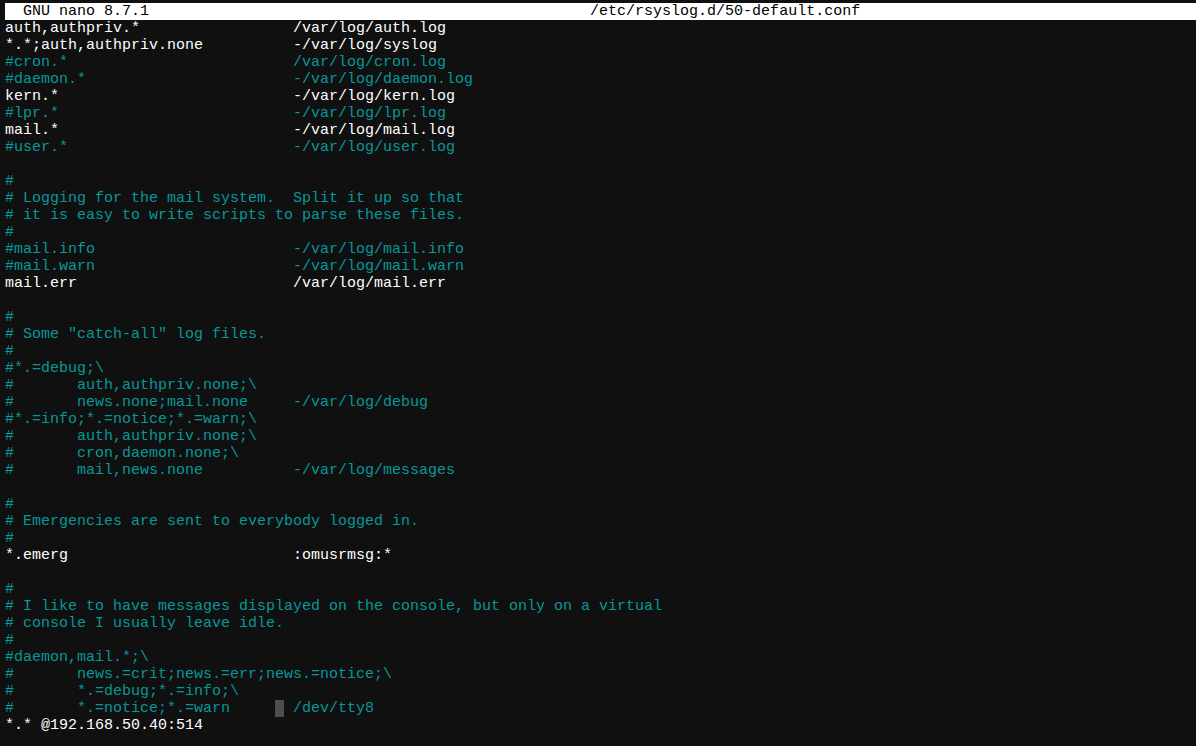
Scroll to the end of the file and add a forwarding rule. Replace IP_OF_SYSLOG_SERVER with your main server IP.
For UDP:
*.* @IP_OF_SYSLOG_SERVER:514
For TCP:
*.* @@IP_OF_SYSLOG_SERVER:514
When you Add server ip then your config file show like below image.
Then save config file using CTRL +X then press Y.
Now restart the client's Rsyslog service using the below command.
sudo systemctl restart rsyslog
Step 6: Verify the Setup
It's time to test if the logs are successfully flowing from the client to the server.
Generate a Test Log on the Client
Run the logger command on your client machine to generate a custom log message:
logger "This is a test message from the client"
Now move to your main Syslog server and search that folder for your test message using the below command. This command is run on your main Syslog server.
sudo cat /var/log/remotelogs/client-hostname/user.log | grep "test message"
If above command give you error then you can use below command.
sudo grep -r "This is a test message from the client" /var/log/
Expected Output:

Conclusion
Setting up a central Syslog server changes your network completely. You completed these steps successfully. You turned isolated data points into a clear picture. Hard-to-reach data is now easy to get. You see your overall network health. You see your network security clearly.
Stop jumping from machine to machine to trace one issue. Stop working in the dark. Rsyslog is now configured correctly. Your server is a powerful hub. Your server is an automated hub. It sorts incoming logs automatically. This makes troubleshooting very fast. This makes monitoring easy. This makes auditing simple.
This foundation is ready to grow with your network. You can add more clients easily. Apply the same forwarding rule to new machines. Improve your setup in the future. Use logrotate to manage disk space automatically. Forward this central data into visualization tools. Use the ELK stack or Graylog.
You took a massive step forward. Your network architecture is more secure. Your network is more organized. Your network is more professional.
