
Dolibarr is a free, open-source software package designed for ERP, CRM, Sales Management, and more. It is free to download, install, and use on all operating systems. The system offers various settings, allowing users to customize and configure it to fit their business needs. In this guide, we will install Dolibarr 23.0.2 on Ubuntu 24.04 LTS Server.
Set System Timezone
Before proceeding, we set our Ubuntu server TimeZone and then we use this timezone in the later step. So you can set your timezone on your Ubuntu server.
Prerequisites
- OS : Ubuntu 24.04 LTS
- RAM : 4GB
- Storage : Minimum 25GB free
- Access : Root or Sudo user
System Update & Upgrade
In a Linux system, before any package installation, we first need to update and upgrade our system. So we update and upgrade our Ubuntu server using the below command.
sudo apt update && sudo apt upgrade -y
Install Apache Web Server
To install Dolibarr 23.0.2 on Ubuntu 24.04 server, we need to install the Apache web server. So install the Apache web server using the below command.
sudo apt install apache2 -y
Now we enable and start the Apache web server using the below commands.
sudo systemctl enable apache2
sudo systemctl start apache2
Verify Apache is running:
sudo systemctl status apache2 | grep "Active:"
Expected output: Active: active (running)
Install MariaDB Database Server
MariaDB Server is a popular, open-source relational database created by the original developers of MySQL. So we install the MariaDB server using the below command.
sudo apt install mariadb-server mariadb-client -y
Enable and start MariaDB:
sudo systemctl enable mariadb
sudo systemctl start mariadb
Secure your MariaDB installation:
When entering the below command, the installation will ask questions. Answer them as given below.
sudo mysql_secure_installation
Answer each prompt as follows:
Enter current password for root:        → Press ENTER
Switch to unix_socket authentication:   → N
Change the root password:               → Y
New password:                           → Enter a strong password
Re-enter new password:                  → Repeat the password
Remove anonymous users:                 → Y
Disallow root login remotely:           → Y
Remove test database and access to it:  → Y
Reload privilege tables now:            → Y
Install PHP 8.3 and All Required Extensions
For the latest version of Dolibarr, you need to install PHP 8.3. So we install PHP using the below commands.
sudo apt install php8.3 libapache2-mod-php8.3 \
php8.3-mysql php8.3-curl php8.3-gd php8.3-intl \
php8.3-mbstring php8.3-xml php8.3-zip php8.3-soap \
php8.3-imap php8.3-ldap php8.3-bcmath php8.3-calendar \
php8.3-fileinfo unzip wget -y
The above commands install PHP, fileinfo, and unzip as well.
Verify PHP version:
php -v
Expected Output:

Fix PHP Timezone
Set the correct PHP timezone in Apache's PHP configuration: In this configuration file, replace your timezone with my timezone Asia/Kolkata.
sudo sed -i 's|;date.timezone =|date.timezone = Asia/Kolkata|' /etc/php/8.3/apache2/php.ini
sudo sed -i 's|^date.timezone = .*|date.timezone = Asia/Kolkata|' /etc/php/8.3/apache2/php.ini
Then verify your date.timezone using the below command.
grep "date.timezone" /etc/php/8.3/apache2/php.ini
The output will look like this, but according to your timezone.
trend@box:~$ grep "date.timezone" /etc/php/8.3/apache2/php.ini
; https://php.net/date.timezone
date.timezone = Asia/Kolkata
Fix System Timezone
It is important to fix your system's timezone. In this step, replace your timezone with Asia/Kolkata.
sudo timedatectl set-timezone Asia/Kolkata
Now we create the Dolibarr database, so proceed from here.
Create Dolibarr Database
In this step, we create a database using MySQL. So when you enter the below command, it will ask for a password — enter the password you set up during the MySQL setup.
sudo mysql -u root -p
Inside MySQL, run these commands:
In this step, if you want to change the password, replace it with Dolibarr@Strong123! — this password is required when you enter the home page of Dolibarr. If you go with the same password, you can change it after logging in.
CREATE DATABASE dolibarr CHARACTER SET utf8mb4 COLLATE utf8mb4_unicode_ci;
CREATE USER 'dolibarruser'@'localhost' IDENTIFIED BY 'Dolibarr@Strong123!';
GRANT ALL PRIVILEGES ON dolibarr.* TO 'dolibarruser'@'localhost';
FLUSH PRIVILEGES;
EXIT;
Verify:
sudo mysql -u root -p -e "SHOW DATABASES;" | grep dolibarr
Output Show: dolibarr
Download Dolibarr 23.0.2
Navigate to the temporary directory and download Dolibarr:
cd /tmp
Now download dolibarr,
wget https://github.com/Dolibarr/dolibarr/archive/refs/tags/23.0.2.zip \
  -O dolibarr-23.0.2.zip
Extract the archive:
unzip dolibarr-23.0.2.zip
Move Files to Web Directory and Set Permissions
This is a critical step where we fix and prevent the timezone problem.
sudo mv dolibarr-23.0.2 /var/www/html/dolibarr


sudo mkdir -p /var/www/html/dolibarr/documents
Now we change the permissions.
sudo chown -R www-data:www-data /var/www/html/dolibarr
sudo chmod -R 755 /var/www/html/dolibarr
Apply The Critical PHP 8.3 Universal Timezone Fix
First, find the DateTimeZone line number using the below command.
LINE=$(grep -n "new DateTimeZone(\$offsettzstring)" \
  /var/www/html/dolibarr/htdocs/core/lib/functions.lib.php \
  | head -1 | cut -d: -f1)

echo "✅ DateTimeZone found at line: $LINE"
The output will show something like DateTimeZone found at line: 3494 (the number may vary).
sudo sed -i "${LINE}i\\
\$tz_aliases = ['Asia/Calcutta'=>'Asia/Kolkata','Asia/Katmandu'=>'Asia/Kathmandu','Asia/Dacca'=>'Asia/Dhaka','Asia/Rangoon'=>'Asia/Yangon','Asia/Macao'=>'Asia/Macau','America/Buenos_Aires'=>'America/Argentina/Buenos_Aires','America/Catamarca'=>'America/Argentina/Catamarca','America/Cordoba'=>'America/Argentina/Cordoba','America/Jujuy'=>'America/Argentina/Jujuy','America/Mendoza'=>'America/Argentina/Mendoza','America/Indianapolis'=>'America/Indiana/Indianapolis','America/Knox_IN'=>'America/Indiana/Knox','America/Louisville'=>'America/Kentucky/Louisville','Pacific/Yap'=>'Pacific/Chuuk','Pacific/Truk'=>'Pacific/Chuuk','Pacific/Ponape'=>'Pacific/Pohnpei'];\\
if (isset(\$tz_aliases[\$offsettzstring])) { \$offsettzstring = \$tz_aliases[\$offsettzstring]; }" \
  /var/www/html/dolibarr/htdocs/core/lib/functions.lib.php
Verify fix is correctly placed:
grep -n "tz_aliases\|new DateTimeZone" \
  /var/www/html/dolibarr/htdocs/core/lib/functions.lib.php | head -5
Configure Apache Virtual Host
Now we configure the Apache Virtual Host. Here we get our IP, which is required in the next step.
SERVER_IP=$(hostname -I | awk '{print $1}')
echo "Your server IP is: $SERVER_IP"
Now we configure the apache server using below command.
sudo nano /etc/apache2/sites-available/dolibarr.conf
Paste this content — replace YOUR_SERVER_IP with your actual IP:
    ServerAdmin [email protected]
    ServerName YOUR_SERVER_IP
    DocumentRoot /var/www/html/dolibarr/htdocs


        Options Indexes FollowSymLinks
        AllowOverride All
        Require all granted


    ErrorLog ${APACHE_LOG_DIR}/dolibarr_error.log
    CustomLog ${APACHE_LOG_DIR}/dolibarr_access.log combined
Save: CTRL+X → Y → ENTER
Enable Site and Apache Modules
sudo a2ensite dolibarr.conf
sudo a2enmod rewrite
sudo a2dissite 000-default.conf
sudo systemctl restart apache2
sudo systemctl restart apache2
Now we verify status of apache2 using below command.
sudo systemctl status apache2 | grep "Active:"
Final Verification
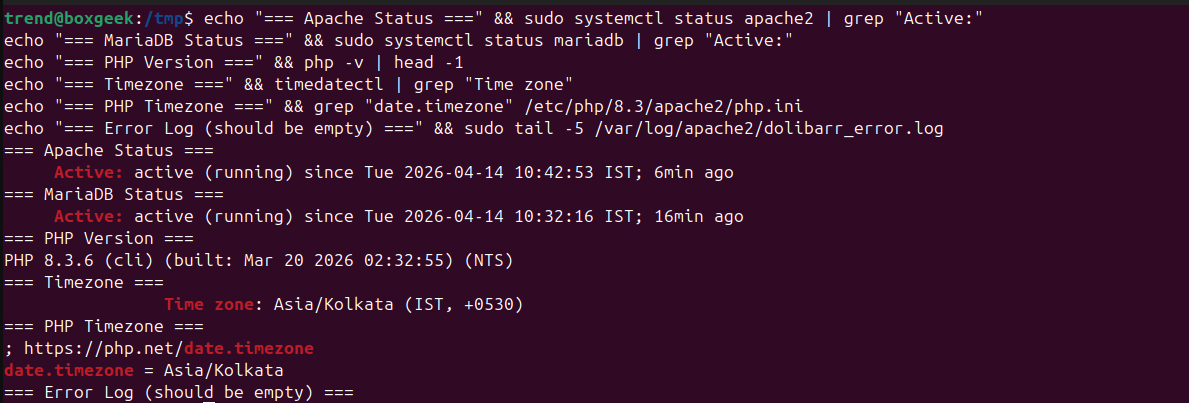
Now we verify all statuses and logs using the below command.
echo "=== Apache Status ===" && sudo systemctl status apache2 | grep "Active:"
echo "=== MariaDB Status ===" && sudo systemctl status mariadb | grep "Active:"
echo "=== PHP Version ===" && php -v | head -1
echo "=== Timezone ===" && timedatectl | grep "Time zone"
echo "=== PHP Timezone ===" && grep "date.timezone" /etc/php/8.3/apache2/php.ini
echo "=== Error Log (should be empty) ===" && sudo tail -5 /var/log/apache2/dolibarr_error.log
Expected Output:
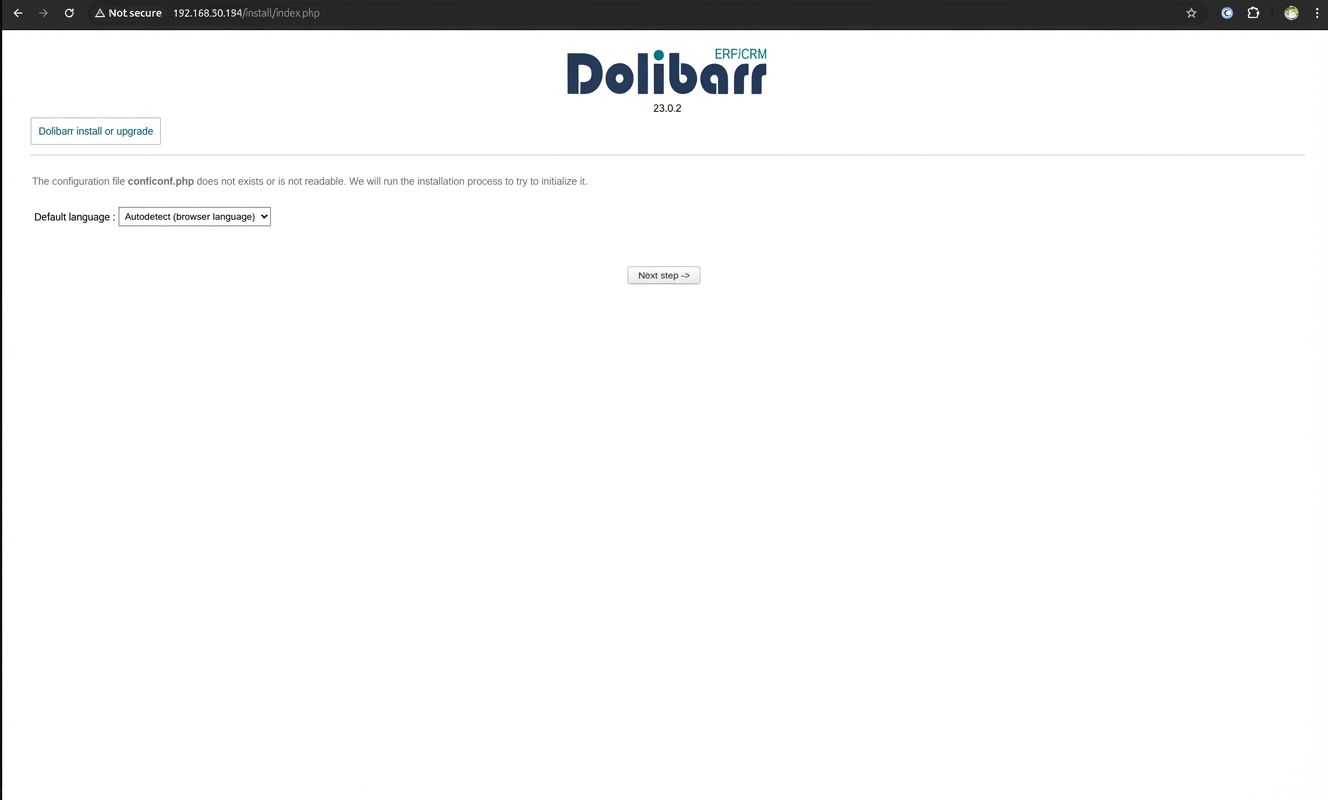
Web Installer Setup
Open browser and go to:
http://YOUR_SERVER_IP
Then open page like below
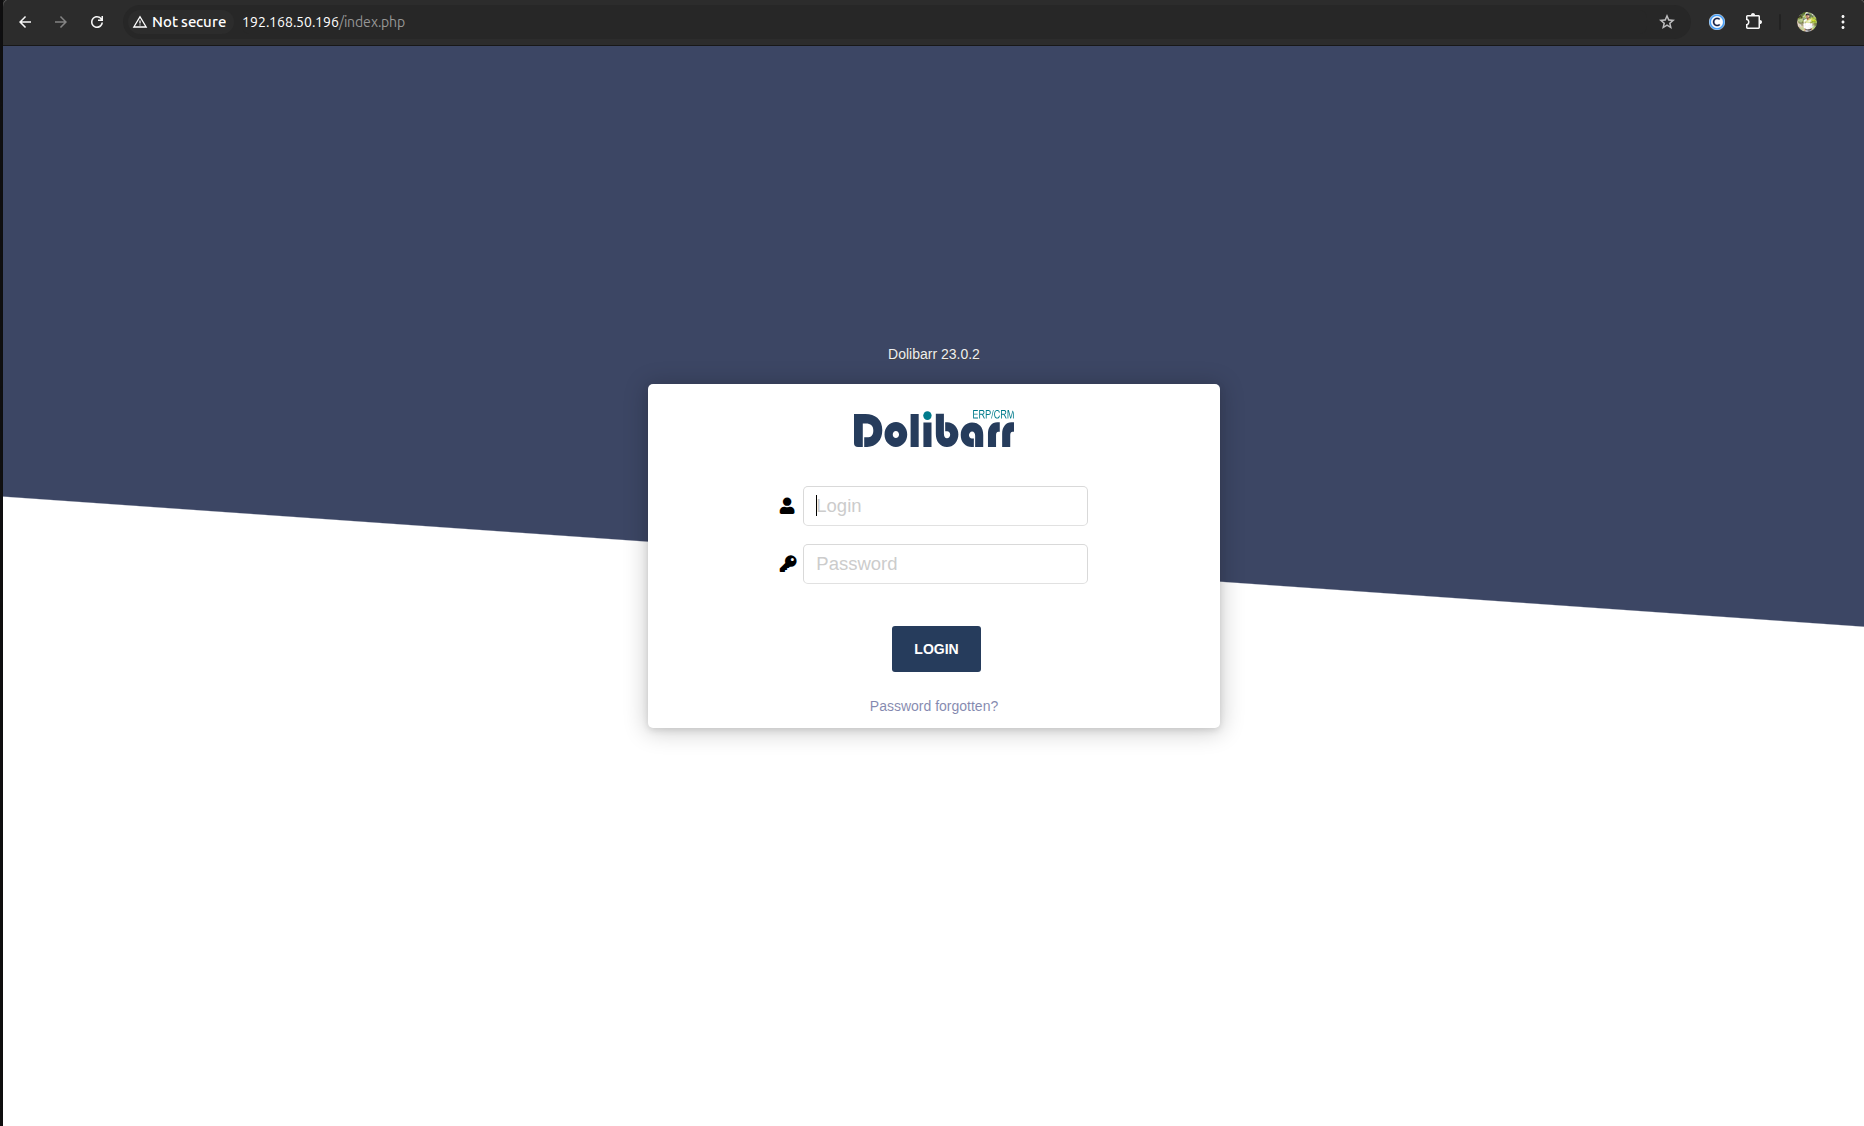
In setup, click on next page and in the next step, make sure you enter a login and password. Here, at login, you create a user in MySQL — enter that username and password. In the next step, create a new user for Dolibarr, which is the username and password you will be asked for every time you login to Dolibarr.
Then your new Dolibarr home will look like below.
Post Installation Security
Remove the installation directory to secure your Dolibarr instance:
sudo rm -rf /var/www/html/dolibarr/htdocs/install
fix permission
sudo chown -R www-data:www-data /var/www/html/dolibarr
sudo chmod -R 755 /var/www/html/dolibarr
Final Apache restart
sudo systemctl restart apache2
Installation Complete
Your Dolibarr 23.0.2 is now fully installed and running on Ubuntu 24.04 LTS server.
