
Apache OFBiz (Open For Business) is a powerful, open-source Enterprise Resource Planning (ERP) system built on Java. It provides a comprehensive suite of business applications including order management, accounting, inventory, e-commerce, and much more — all in one unified platform. In this guide, we will walk you through a complete, production-ready installation of Apache OFBiz 24.09.05 on Ubuntu 24.04 Server.
Prerequisites
- OS : Ubuntu 24.04 LTS
- RAM : Minimum 4GB
- Storage : 30GB free space
- Access : sudo privileges
Update the System and Install Basic Tools
In Linux, every time we install a new package, we need to ensure our system is up to date. So here we update our system using the below command.
sudo apt update && sudo apt upgrade -y
Now we install our basic tools which are needed throughout the installation process.
sudo apt install -y wget unzip curl nano git
Install Java 17
Apache OFBiz 24.09.05 requires Java 17 or higher. So here we install OpenJDK 17 using the below command.
sudo apt install openjdk-17-jdk -y
Verify the installation:
java -version
Expected Output:

Create a Dedicated OFBiz User
For security purposes, we create a new user for OFBiz. Here we create a user named ofbiz; you can use any name according to your preference. But if you don't use the username ofbiz, then wherever you see ofbiz, replace it with your username.
sudo useradd -m -d /opt/ofbiz -s /bin/bash ofbiz
sudo chmod 755 /opt/ofbiz
This creates a user named ofbiz with its home directory at /opt/ofbiz.
Download and Extract OFBiz
First, we change our directory to /opt, then we download the Apache OFBiz 24.09.05 zip file and extract the archive.
cd /opt
sudo wget https://downloads.apache.org/ofbiz/apache-ofbiz-24.09.05.zip
Extract the archive:
sudo unzip /opt/apache-ofbiz-24.09.05.zip -d /opt/ofbiz-temp
Move the files to the correct location and clean up:
sudo mv /opt/ofbiz-temp/apache-ofbiz-24.09.05 /opt/ofbiz/
sudo rm -rf /opt/ofbiz-temp
sudo rm -f /opt/apache-ofbiz-24.09.05.zip
Set proper ownership and permissions:
sudo chown -R ofbiz:ofbiz /opt/ofbiz
sudo chmod 755 /opt/ofbiz
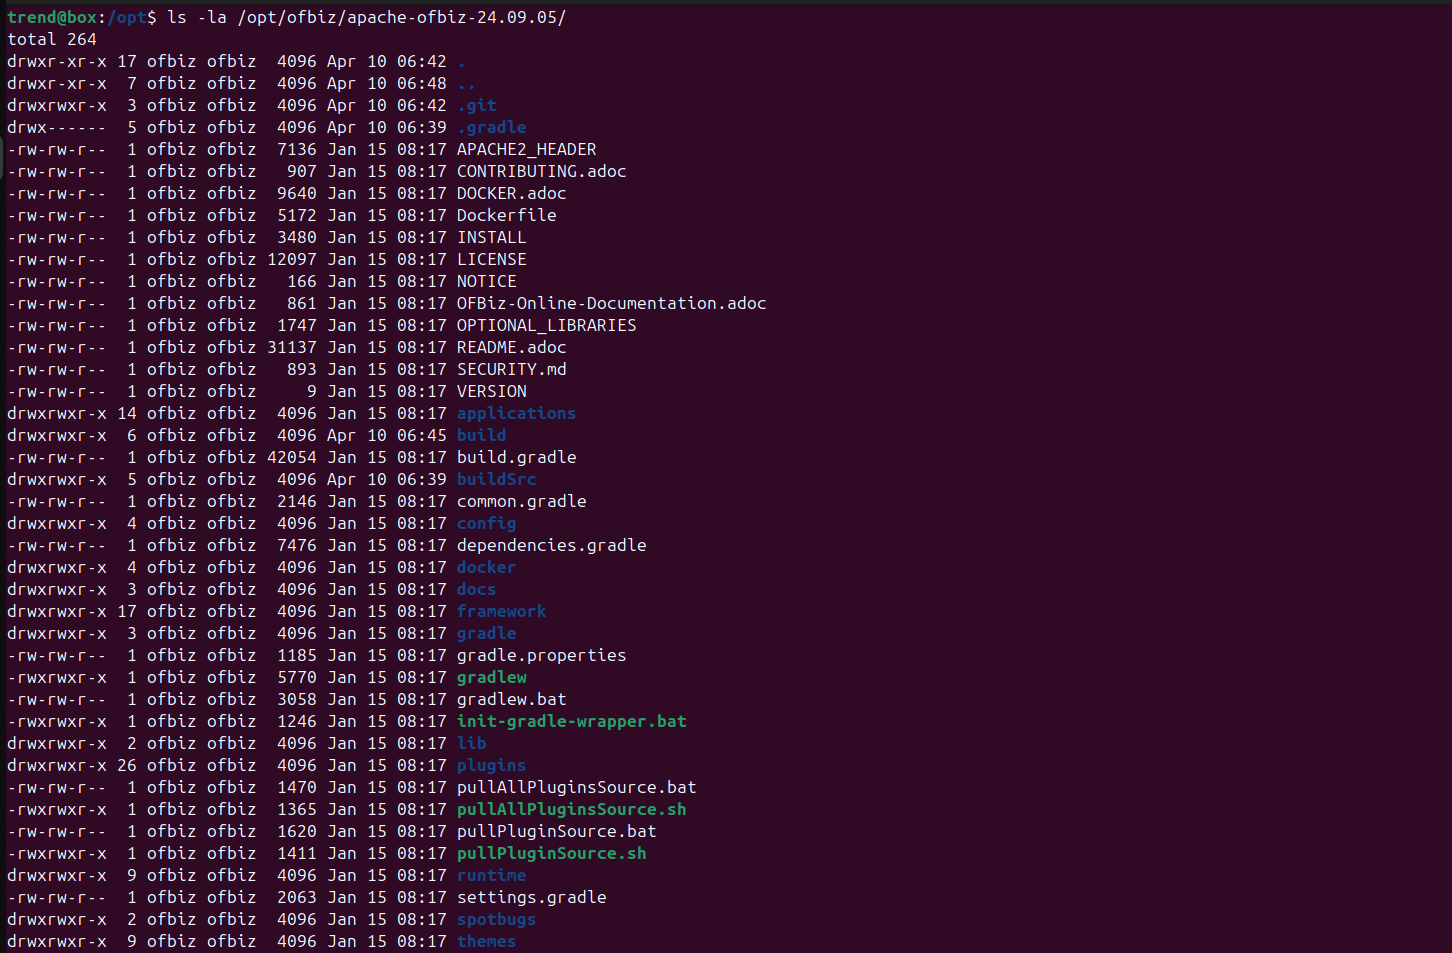
Verify the directory structure:
ls -la /opt/ofbiz/apache-ofbiz-24.09.05/
Output:
Fix the Gradle Wrapper
OFBiz 24.09.05 ships without the gradle-wrapper.jar file in the distribution package. You need to download it manually. So we download it using the below commands.
sudo wget https://raw.githubusercontent.com/gradle/gradle/v7.6.0/gradle/wrapper/gradle-wrapper.jar \
     -O /tmp/gradle-wrapper.jar

sudo mv /tmp/gradle-wrapper.jar /opt/ofbiz/apache-ofbiz-24.09.05/gradle/wrapper/gradle-wrapper.jar


sudo chown ofbiz:ofbiz /opt/ofbiz/apache-ofbiz-24.09.05/gradle/wrapper/gradle-wrapper.jar
Verify the wrapper directory:
ls -la /opt/ofbiz/apache-ofbiz-24.09.05/gradle/wrapper/
Output:

Build OFBiz and Load Data
Now we switch to the ofbiz user and run the build using the below command.
sudo -u ofbiz bash


cd /opt/ofbiz/apache-ofbiz-24.09.05
verify that Gradle is working correctly:
./gradlew --version
Expected output:
------------------------------------------------------------
Gradle 7.6
------------------------------------------------------------

Build time:   2022-11-25 13:35:10 UTC
Revision:     daece9dbc5b79370cc8e4fd6fe4b2cd400e150a8

Kotlin:       1.7.10
Groovy:       3.0.13
Ant:          Apache Ant(TM) version 1.10.11 compiled on July 10 2021
JVM:          17.0.18 (Ubuntu 17.0.18+8-Ubuntu-124.04.1)
OS:           Linux 6.17.13-2-pve amd64
Now we run the full build and data load. This process may take some time — around 15–20 minutes. So after entering the command, wait a few minutes. At the end of the process, something like BUILD SUCCESSFUL in Xm Xs will be shown.
./gradlew cleanAll loadAll
Once complete exit and back to your sudo user.
exit
Fix the Host Header Security Setting
OFBiz has a security feature that blocks requests from unrecognized hostnames. So you need to add your server IP address to allow your IP. Here, replace YOUR_SERVER_IP with your server IP address (e.g. 192.168.xx.xx).
sudo sed -i 's/host-headers-allowed=localhost,127.0.0.1/host-headers-allowed=localhost,127.0.0.1,YOUR_SERVER_IP/' \
/opt/ofbiz/apache-ofbiz-24.09.05/framework/security/config/security.properties
Verify the change was applied:
grep "host-headers-allowed" /opt/ofbiz/apache-ofbiz-24.09.05/framework/security/config/security.properties
Create a Systemd Service
When installing Apache OFBiz on an Ubuntu server, we need a systemd service to ensure OFBiz starts automatically on server reboot. So we set up the service using the below command.
sudo tee /etc/systemd/system/ofbiz.service > /dev/null << 'EOF'
[Unit]
Description=Apache OFBiz ERP
After=network.target

[Service]
Type=simple
User=ofbiz
WorkingDirectory=/opt/ofbiz/apache-ofbiz-24.09.05
ExecStart=/opt/ofbiz/apache-ofbiz-24.09.05/gradlew ofbiz
ExecStop=/opt/ofbiz/apache-ofbiz-24.09.05/gradlew ofbizStop
Restart=on-failure
RestartSec=10

[Install]
WantedBy=multi-user.target
EOF
Enable and start the service:
Now we enable and start the OFBiz service.
sudo systemctl daemon-reload
sudo systemctl enable ofbiz
sudo systemctl start ofbiz
Check the service status:
sudo systemctl status ofbiz
In result look at Active: active (running) status.
Set Up Nginx as a Reverse Proxy with SSL
Here we set up Nginx as a reverse proxy, because Nginx provides better security and performance.
Install Nginx:
sudo apt install nginx -y
Create a self-signed SSL certificate:
In this step, replace your IP with YOUR_SERVER_IP.
sudo mkdir -p /etc/ssl/ofbiz

sudo openssl req -x509 -nodes -days 365 \
  -newkey rsa:2048 \
  -keyout /etc/ssl/ofbiz/ofbiz.key \
  -out /etc/ssl/ofbiz/ofbiz.crt \
  -subj "/C=IN/ST=Gujarat/L=Surat/O=MyCompany/CN=YOUR_SERVER_IP"
Create the Nginx configuration:
Now we create the Nginx configuration. In this configuration, replace YOUR_SERVER_IP with your IP in the below command.
sudo tee /etc/nginx/sites-available/ofbiz > /dev/null << 'EOF'
server {
    listen 80;
    server_name YOUR_SERVER_IP;
    return 301 https://$host$request_uri;
}

server {
    listen 443 ssl;
    server_name YOUR_SERVER_IP;

    ssl_certificate     /etc/ssl/ofbiz/ofbiz.crt;
    ssl_certificate_key /etc/ssl/ofbiz/ofbiz.key;
    ssl_protocols       TLSv1.2 TLSv1.3;
    ssl_ciphers         HIGH:!aNULL:!MD5;

    location / {
        proxy_pass https://localhost:8443;
        proxy_ssl_verify off;
        proxy_set_header Host $host;
        proxy_set_header X-Real-IP $remote_addr;
        proxy_set_header X-Forwarded-For $proxy_add_x_forwarded_for;
        proxy_set_header X-Forwarded-Proto $scheme;
        proxy_read_timeout 300;
        proxy_connect_timeout 300;
    }
}
EOF
Enable the configuration:
sudo ln -s /etc/nginx/sites-available/ofbiz /etc/nginx/sites-enabled/
sudo rm -f /etc/nginx/sites-enabled/default
Test and restart Nginx:
In this step, we test Nginx and then restart and enable the Nginx service.
sudo nginx -t
sudo systemctl restart nginx
sudo systemctl enable nginx
Expected output from nginx -t:

Configure the Firewall
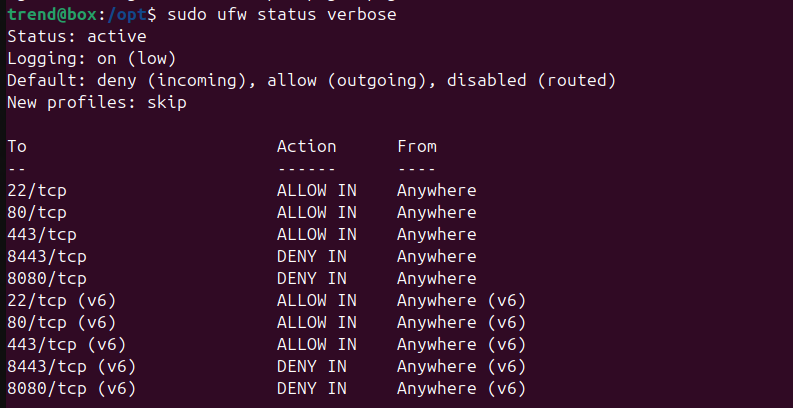
When installing Apache OFBiz on an Ubuntu server, we need to configure firewall rules and allow and deny some ports using the below commands.
sudo ufw allow 22/tcp

sudo ufw allow 80/tcp
sudo ufw allow 443/tcp

sudo ufw deny 8443/tcp
sudo ufw deny 8080/tcp

sudo ufw --force enable
Verify the rules using the below command.
sudo ufw status verbose
Expected output:
Change the Default Admin Password
The default OFBiz admin password is ofbiz. You can change your default admin password using the below commands. Replace YourNewPassword with your desired password.
cd /opt/ofbiz/apache-ofbiz-24.09.05
sudo -u ofbiz ./gradlew loadAdminUserLogin \
  -PuserLoginId=admin \
  -Ppassword=YourNewPassword
Final Verification
Run the checks below to confirm everything is working correctly.
sudo systemctl status ofbiz

sudo systemctl status nginx

sudo ss -tlnp | grep -E '80|443|8080|8443'
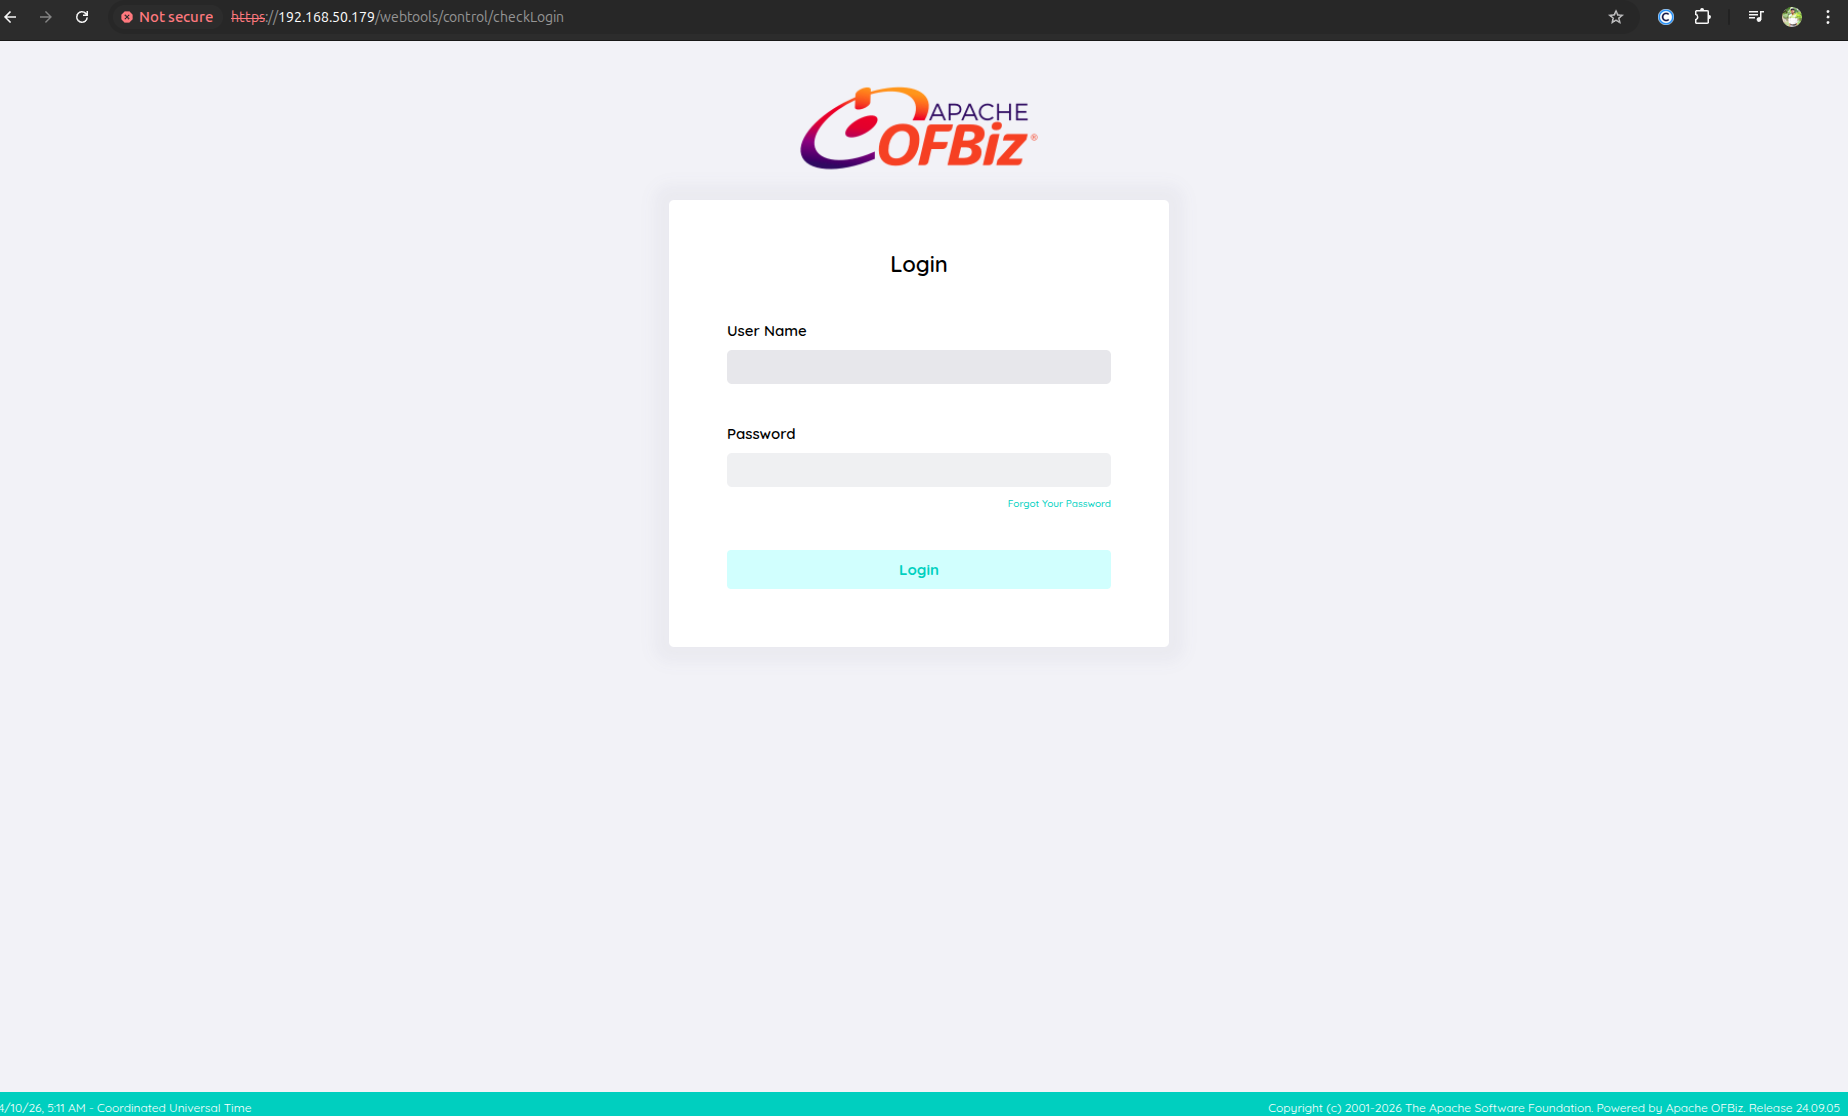
Accessing OFBiz
Open your browser and paste the below URL, replacing YOUR_SERVER_IP with your IP address.
https://YOUR_SERVER_IP/webtools/control/main
Then wait for your home page to open, as shown in the image below. Click on login.

Finally, Apache OFBiz has been successfully installed on Ubuntu Server.
